Sunday, October 25, 2009

I really love Illustration


Since Danah's class on Illustration, I've been thinking a lot about what my style as an illustrator is, and I've been doing some practising and looking on the web for inspiration.

I love fashion illustration, and I love anything that utilizes watercolour, pencil, or pen and ink. Even though I love clean lines and minimalism when it comes to graphic design, I'm also cultivating a love for the messy and the imperfect.

I've been in love with Danny Roberts for a while now- he's a LA-based fashion illustrator who's been gaining a great deal of recognition in the Internet world (see above)
I'm not so sure if this is intentional, but do you see the way the pen is used to make the torso appear really crisp, but the coat draped over the model's shoulders is blurred? Perhaps it's the effect of the scanner, but it almost looks as though it's a play on depth of field.

Been digging Kareem Iliya as well. I love his style- simple, striking, stopping himself before it gets too complicated.


Martine Johanna does awesome stuff as well.... check out this blog for more illustration love.


The joys of Typography


Typography Poster

I've always been a huge fan of Typography- the creative ways that words are arranged on a page to produce patterns or just to create visual interest. Sometimes these words create pictures, like in the examples seen below.

I went looking for examples of typography online, and I realized that I really loved the effect of slanted text. I created a grid inspired by an example I found online: and then I shifted it using transform (CTRL+T) and shift. I followed the basic outline of the grid, but had to depart from it in order to create more spaces between lines so that the words wouldn't be too congested. (For eg, the spaces between Broadcast Animation, Web Design, Sound Editing, etc.)

I purposely did not include colour and only stuck to two types of font because I wanted the typography to be the showcase. I wanted to prove that I could create an eye-catching poster with text alone, and I'm pleased with the results! Below is the poster I handed in.. the only thing that could've been changed is the address at the bottom, which should have been bigger.

Kerning

My professor also pointed out that there were some irregular spaces in the type- there's an inexplicable space, for eg., between the 'L' and the 'T' in Multimedia. The kerning, or the space between the letters, needed to be adjusted (yay! learnt a new concept.) In order to increase or decrease the space between letters, click ALT + left or right arrow keys.

Below is the new version of the poster!

I definitely have to add that due to this course, I've been paying more attention to how type is used on everything from party invites to drink labels. Multimedia is the best.


Saturday, October 10, 2009

Photoshop Madness


So, here's another challenge that's presented itself to me- Adobe Photoshop.

I used to use Photoshop a lot to make posters, etc, and as a substitute for Illustrator when I didn't have it on my machine, but now we've got to learn how to use it properly as part of my Multimedia course. As I'm beginning to realize, using Photoshop isn't as easy as it seems.

This is what I learnt in my first Photoshop class:
  • Photoshop is for raster images (images that use pixels, and where you can't manipulate the points), Illustrator is for vector images (images where the points can be manipulated on a plane). I always thought of Illustrator as the drawing programme, and Photoshop as the editing programme. Looks like I wasn't half wrong!
  • TAB gets rid of excess windows, F lays your picture against different coloured backgrounds so that it's easier to work with!
  • How to resize images to a ratio. Select the crop tool and change height and width (we used 3:4)- no matter how large you make the box, it'll still be within your chosen ratio!
  • That in the toolbox, tools are grouped according to their function. Handy guide above.
  • How to make an image into the face of a CD. It's actually a longer and trickier process than can be imagined, but I'll post how it's done later!
And a lot more, but that's all for today!


And guess who's actually using things from class in the real world?


Me!

My friend Ian asked me to help him redesign a football shirt for his Med Sci football team at UWI. This is what I worked on so far... it's not just finished yet. Drawn from scratch by me! Working on the TVJ project Danah gave us helped a lot with this, as we had to design and draw a t-shirt for the television company as part of this assignment to rebrand them.

In other news, Damien Baddy's class seems to be helping me to become more versed in the language of photography. Through couchsurfing, I met a girl, Irina, who actually did photography as a major at FIT in NYC. We talked a lot about how to take good photos (her advice when I can't find how to make a subject appear interesting is to "go closer", as cryptic as that possibly sounds). I lamented that I was worried that my camera wasn't the best quality (I use my roommate's point and shoot because my camera's in Trinidad), and she told me that it's all about the magician, not the wand. This is either the most reassuring or the most disheartening advice on photography I've ever heard.

Monday, October 5, 2009

Portraits are Awesome


So, for our last photography assignment, we were supposed to take pictures that best represented ourselves using the techniques we learnt in class, like the rule of thirds that I mentioned in the last post. I tried experimenting with various concepts and ideas, but I decided in the end that I really wanted a simple self-portrait that expressed me. I played around with light and shadow and in the end I got some really cool effects that looked like they weren't even done with a simple point-and-shoot. All I did was point a lamp downwards and take pictures in the shadows created by the light.

Saturday, October 3, 2009

Photography- Harder than it looks?


It seems like everyone today is a professional photographer- that once you've got enough money to afford a fancy SLR camera, you're automatically entitled to posting up the photos you've taken within the first half hour of purchase on your facebook page especially made to market yourself to all your contacts as an experienced professional ready for hire.

I guess this is why I've always been so skeptical about photography. It seems too much like an everyman's sport, like it doesn't involve as much skill, time and effort as laboriously sketching and painting a picture, or sculpting an image out of clay. Photography to me always seemed a necessary evil- something you had to do in order to capture an image of something that you needed to look at afterwards. I'm slowly (and reluctantly!), however, beginning to change my mind, thanks to the photography module of my multimedia course.

I'm learning, first off, that even though it looks effortless, photography is really time-consuming. Perhaps capturing a shot doesn't take as much time as painting the ceiling of the Sistine chapel, for example, but the attention to detail involved is the same. In order to capture your subject perfectly, you've got to ensure that you've got the correct lens, that the aperture is set to to the correct opening (larger apertures mean that the film or sensor is more exposed to light), that the appropriate lighting is available (especially if you plan on using natural light), and that the shutter speed is as you want it in order to achieve the desired effect (slow shutter speeds, for example, can capture the blurred effects of cars and lights moving at night). You've also got practical issues to consider- if you're using models, for example, whether they'll arrive in enough time for you to capture the last rays of sunlight before it starts to rain, and whether you've got permission for taking photographs in a specific location.

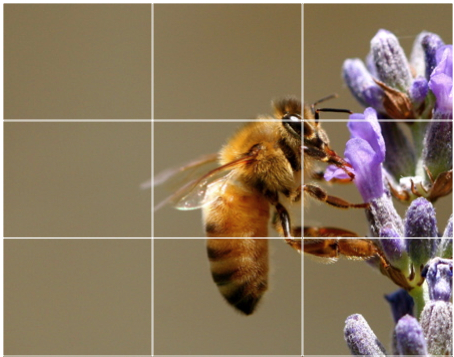
Good photography also employs the same visual principles as any good piece of art, such as employing the use of perspective (which adds depth to photos) and the rule of thirds, which is this idea that states that images are more dynamic and appealing if the subject and lines fall within the lines of a box (as is shown below).


I also picked up some handy tips from class- it's useful, for eg, to save a photo in TIFF form as opposed to JPEG, because jpegs tend to lose some of the information with regards to the pixels in the photo when you convert images from RAW files off your camera. TIFF files preserves quality better than JPEGs do.

So, though photography may not be my medium of choice, I'm learning to respect it a bit more.

Also, I found this pretty cool tutorial on making point and shoot images look as though they were taken with an SLR camera. I want to try it on the first image in the post, which is one I took for my individual assignment.